Red, White & Blue Popsicles

These homemade fruit popsicles bring all the laid-back summer vibes. Cool, refreshing, and easy to love, they’re perfect for pool hangs, 4th of July parties, Father’s Day, and Memorial Day get-togethers. A sweet, simple way to beat the heat.

- Serves: 10
- Prep Time: 20 minutes
- Freeze Time: 6 hours
Why we love it
- It’s easy (like, actually easy… not Pinterest easy)
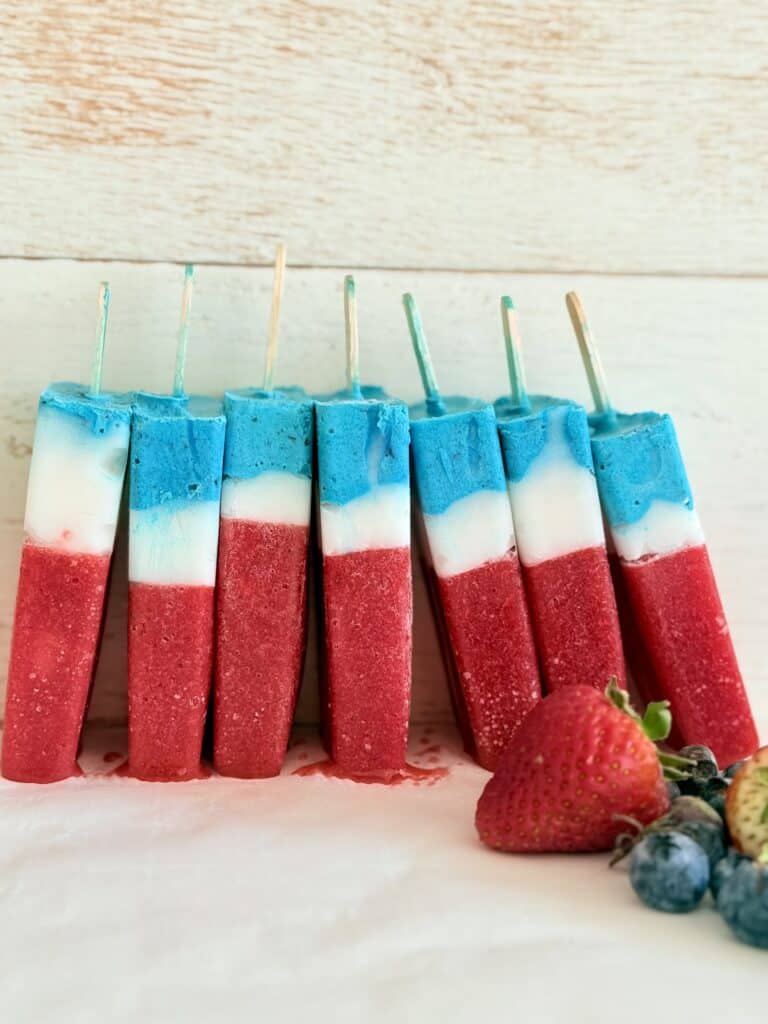
- Looks impressive with those clean layers
- Tastes like summer without the sugar crash
- Kids think you’re a hero, adults think you tried harder than you did
Ingredients:
For the Red layer:
- 1 cup strawberries
- 2 tablespoons water
For the White layer:
- 1 cup coconut yogurt (or any yogurt you like)
For the Blue layer:
- 1 cup blueberries
- 2 tablespoons water
Optional- For a Brighter Blue Throwback Vibe):
- A few drops of blue food coloring
- Cool Whip

Get the full printable instructions with measurements at the bottom of the post in the recipe card.
🍋 Simply Made Suggestions…
Can I make these dairy-free?
Already are if you use coconut yogurt 👍
Do I have to use food coloring?
Nope. Totally optional. The natural blueberry color is just more… muted.
Can kids help with this?
Yes—and they’ll think the layering is the coolest part.
Step-by-Step Directions:
Step 1: Blend your washed and dried strawberries with ¼ cup of water in a blender until smooth! If desired, strain through a fine mesh to create a smooth, seedless mixture. Pour it evenly into popsicle molds. Freeze for 2-4 hours.


🍓If your popsicle molds didn’t come with sticks, no worries—we’ve all been there. Freeze the first layer for about an hour, just until it’s firm enough to hold its shape. Then take them out, gently insert wooden sticks into the center, and pop them back in the freezer to fully set.
👍 Once everything is nice and solid, you’re good to go with the next layer.
Step 2: Spread a layer of coconut yogurt (or any yogurt you like) over the frozen strawberry layer, then pop it back in the freezer for 2-4 hours to set perfectly!

Step 3: Blend the washed blueberries and the remaining ¼ cup of water in a food processor or high-speed blender until smooth, then pour the mixture over the coconut yogurt layer in the popsicle molds.
👉 Place them back in the freezer for another 2-4 hours, or until solid. Enjoy your refreshing popsicles!
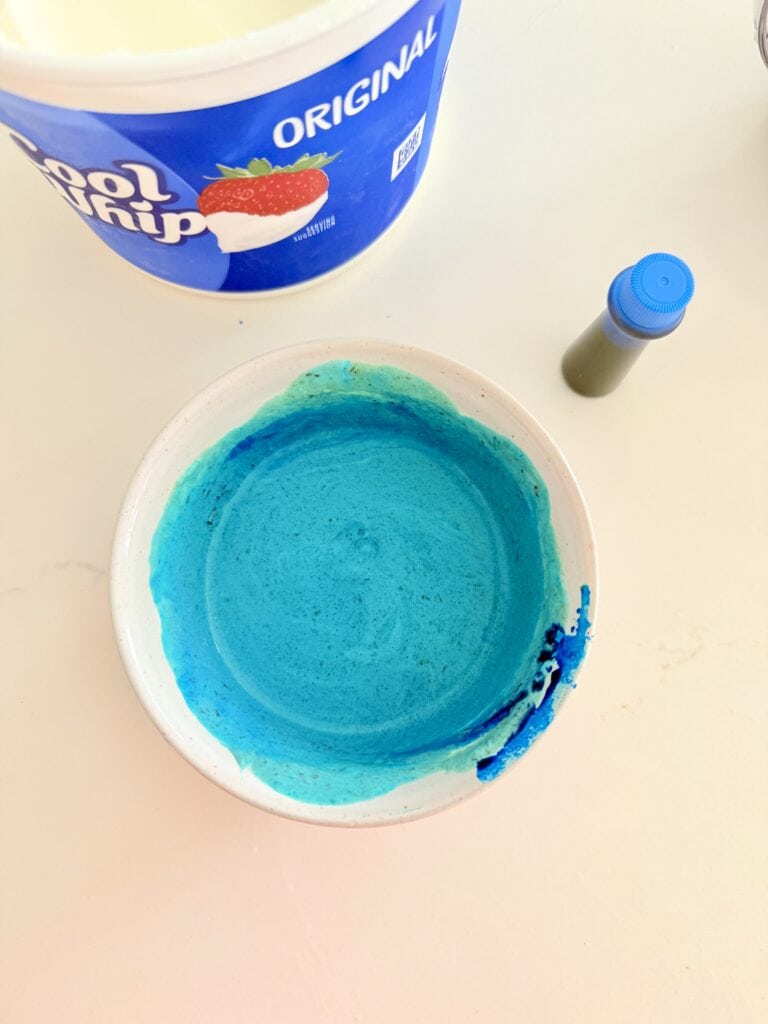
*Optional Step: To add a vibrant splash of color to the blueberry layer, add 4-5 tablespoons of Cool Whip and a few drops of blue food coloring until you reach your perfect shade!

Make It a Full Simply Made Dish Spread
If you’re building this into a full summer menu, here’s your easy lineup:
- 🇺🇸 These popsicles for dessert
- 🍽️ A sheet pan dinner (because we’re not doing dishes all night)
- 🥣 A fresh side like your pico de gallo
- 🍰 And if you want something extra? Pineapple Delight Cake brings that full 1980s potluck energy

*Without blue food coloring added.
*With blue food coloring added.
🎙️Real talk tip
If you don’t let each layer freeze first, you’re not getting stripes—you’re getting a tie-dye situation. Still edible… just not as cute.
🛍️ Storage
Keep in the freezer for up to 1–2 weeks (if they last that long).
Run the mold under warm water for a few seconds to release easily.
👉 Easy Swaps
- Use Greek yogurt for a thicker, creamier center
- Swap in raspberries or blackberries if that’s what you’ve got
- Want it sweeter? Add a little honey or maple syrup
- No molds? Small cups + wooden sticks = problem solved
🍋 Simply Made Suggestions…
Can I make these dairy-free?
Already are if you use coconut yogurt 👍
Do I have to use food coloring?
Nope. Totally optional. The natural blueberry color is just more… muted.
Can kids help with this?
Yes—and they’ll think the layering is the coolest part.
🇺🇸 Before You Go…
If you like bakes and comfort recipes—if you’re in that mood, your Apple Cinnamon Roll Bake or Chocolate Chip Banana Breakfast Bake are perfect weekend pairings.
Red, White & Blue Popsicles

Equipment
- Popsicle mold
- wooden popsicle sticks
- high-speed blender
Ingredients
- 3 cups fresh strawberries
- ¾ cup coconut yogurt
- 1 cup blueberries
- ½ cup water (¼ water for strawberries & ¼ cup water for the blueberries)
Optional Ingredients for Blueberry layer
- 4-5 Tbsp Cool Whip Dessert Topping
- Blue food coloring
Instructions
- Blend your washed strawberries and a ¼ cup of water in a blender! Strain through a fine mesh to create a smooth, seedless mixture. Pour it evenly into popsicle molds. Freeze for 2-4 hours.
- If your popsicle molds don’t come with sticks, no problem! Freeze them for about an hour, then pop them out and insert wooden sticks into your delicious strawberry popsicles. Return them to the freezer and let them freeze completely. Once they’re set, you can add the next delightful layer.
- Spread a layer of coconut yogurt over the frozen strawberry layer, then pop it back in the freezer for 2-4 hours to set perfectly!
- Blend the washed blueberries and the remaining ¼ cup of water until smooth, then pour the mixture over the coconut yogurt layer in the popsicle molds. Place them back in the freezer for another 2-4 hours, or until solid. Enjoy your refreshing popsicles!
- *Optional Step: To add a vibrant splash of color to the blueberry layer, add 4-5 tablespoons of Cool Whip and a few drops of blue food coloring until you reach your perfect shade!
Nutrition
Disclaimer: All nutrition values are per serving and approximate. They will vary depending on products and quantities used.